Installation of Hubexo Smart for Salesforce
Preparation
Salesforce Package
A Salesforce Package must be installed in your Salesforce environment. It can be installed via link: https://login.salesforce.com/packaging/installPackage.apexp?p0=04tTc000000LCEHIA4
or via terminal using the following command:
sf package install -o [YOUR SALESFORCE ORG] -w 5 -r -p 04tTc000000LCEHIA4
Setup guide for Salesforce
Step 1: Go to setup your Salesforce
To setup your Salesforce Organization:
- Click the “Settings” icon in the top-right corner
- Click on “Setup”

Step 2: Create new Permission Set
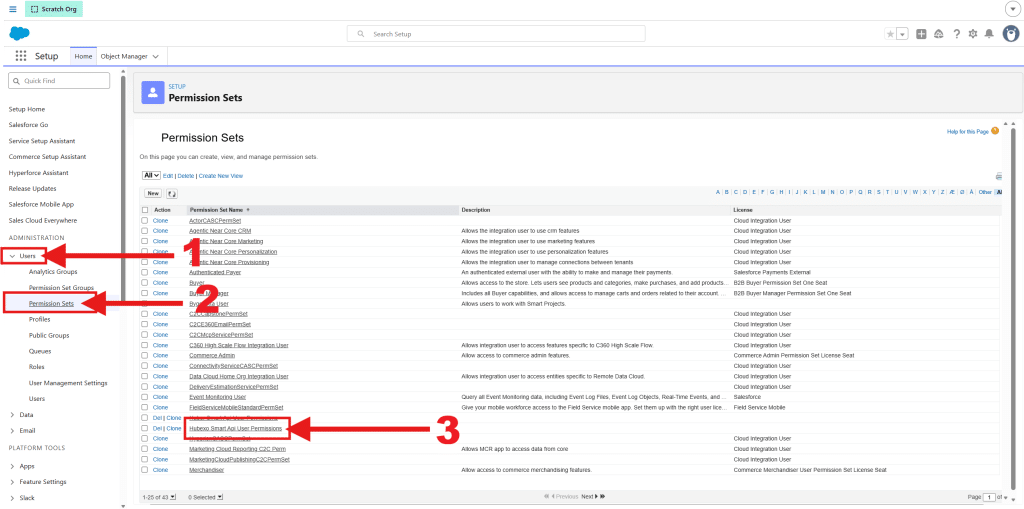
Go to “Permission Sets” by typing it in the “Quick Find” box or:
- Make sure the “Users” dropdown in the left panel is unfolded
- Click on “Permission Sets”
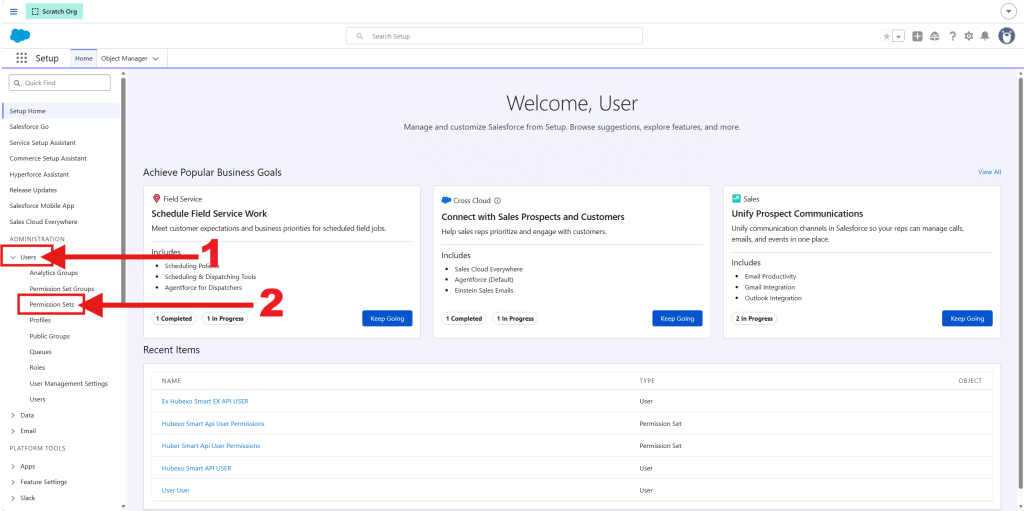
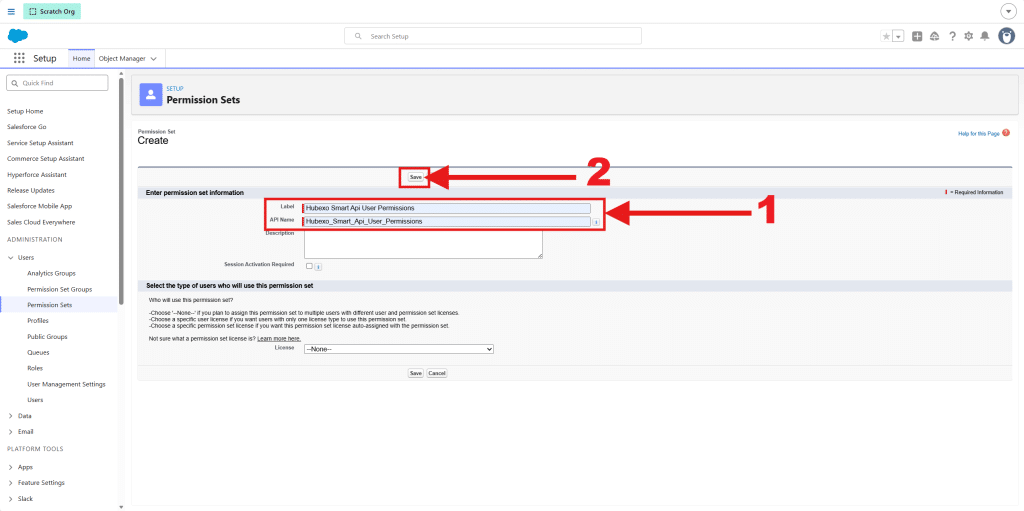
When you have entered the Permission Sets page, click on the “New” button
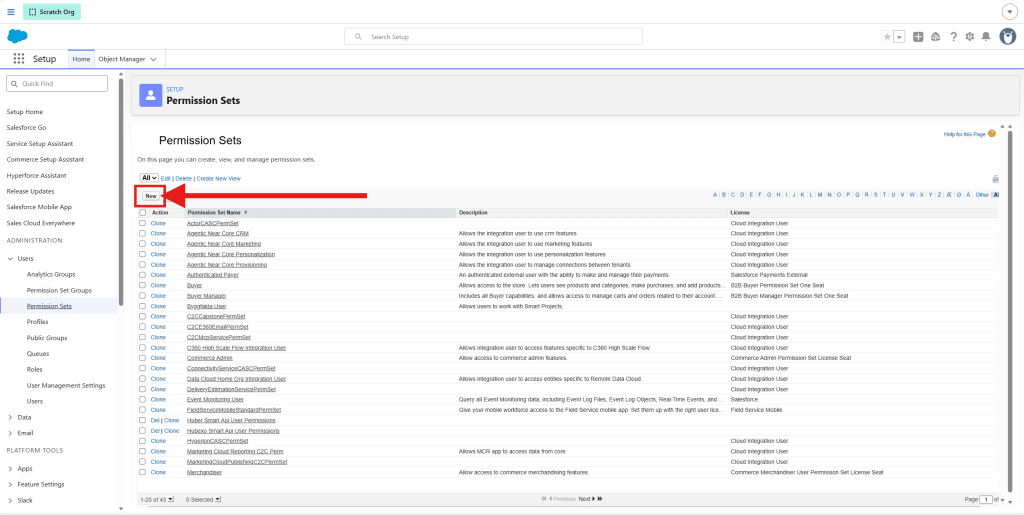
- Type a “Label” name in the first input field. You can use whatever label name you prefer, but for this guide we will use the label “Hubexo Smart Api User Permissions”. You can use this as well if you like. When you have typed the label name, do not hit “Enter” on your keyboard. If you do, you will be redirected back to the previous page, and have to click on the “New” button again (previous step)
Instead click on the “API Name” input field (after you have entered the label name) and then it will autogenerate the API name for you. - Click on the “Save” button
Now you are ready for the next step.
Step 3: Adjust the settings of your Permission Set
In the following steps you have to edit the “Object Settings” and “System Permissions”. The necessary edits are:
| Setting | Name | Access | Comments |
| Permission Set -> Object Settings -> Accounts | Accounts | Create, Modify All Records, View All Fields, Edit Access | |
| Permission Set -> Object Settings -> Contacts | Contacts | Create, Modify All Records, View All Fields, Edit Access | |
| Permission Set -> Object Settings -> Opportunities | Opportinuties | Create, Modify All Records, View All Fields, Edit Access | |
| Permission Set -> Object Settings -> Smart Projects | Smart Projects | Create, Modify All Records, View All Fields, Edit Access | |
| Permission Set -> Object Settings -> Smart Project Members | Smart Project Members | Create, Modify All Records, View All Fields, Edit Access | |
| Permission Set -> System Permissions | System Permissions | View Setup and Configuration, View Roles and Role Hierarchy |
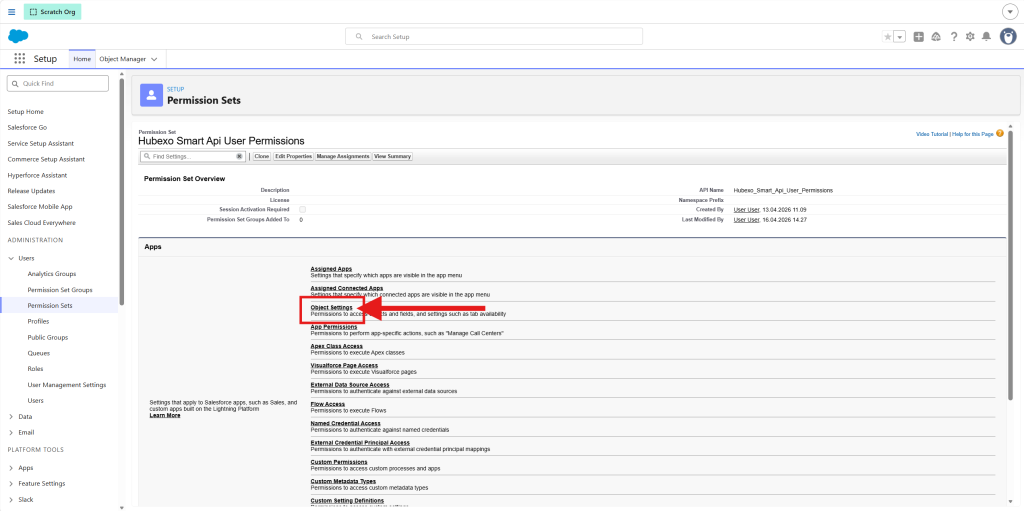
Step 3.1: Object Settings
Go to the “Object Settings” page for your new Permission Set
If not already there go to “Permission Set” by typing it in the “Quick Find” box or:
- Make sure the “Users” dropdown in the left side panel is unfolded
- Click on “Permission Sets”
Then:
- Click on your newly created Permission Set
Then click on “Object Settings”
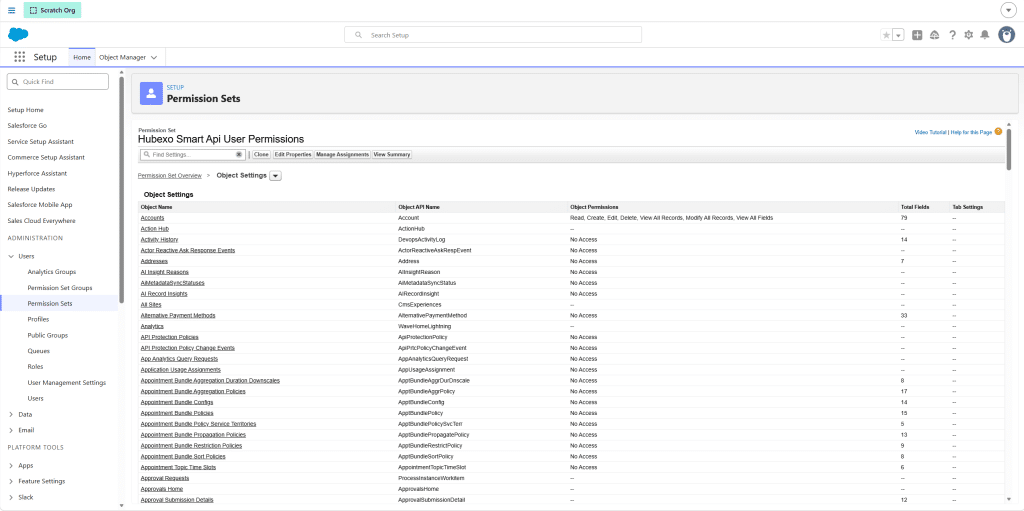
There are many different Object Settings, but we only have to edit the following:
- Accounts
- Contacts
- Opportunities
- Smart Projects
- Smart Project Members
Editing these Object Settings is a repeating process. You have to do exactly the same for all of them.
We will use the “Accounts” Object Settings as an example.
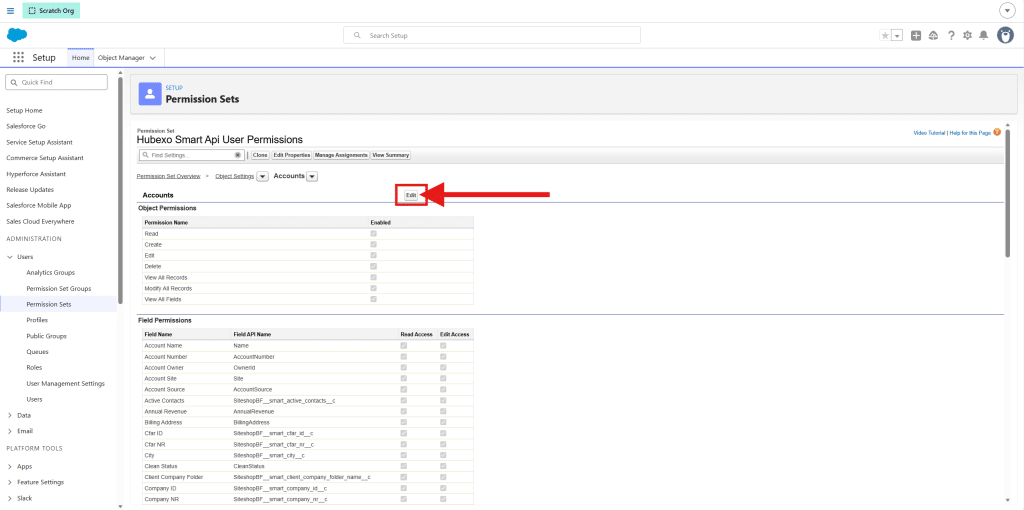
Step 3.1.1: Go to the desired objects settings
First we have to find the Object Settings we want to edit. When found in the list of Object Settings, click on the title of the one you are going to edit.
As mentioned in the section above, “Accounts” will be used for this example.

Step 3.1.2: Go to edit Object Settings
Access the Object Settings by clicking the “Edit” button
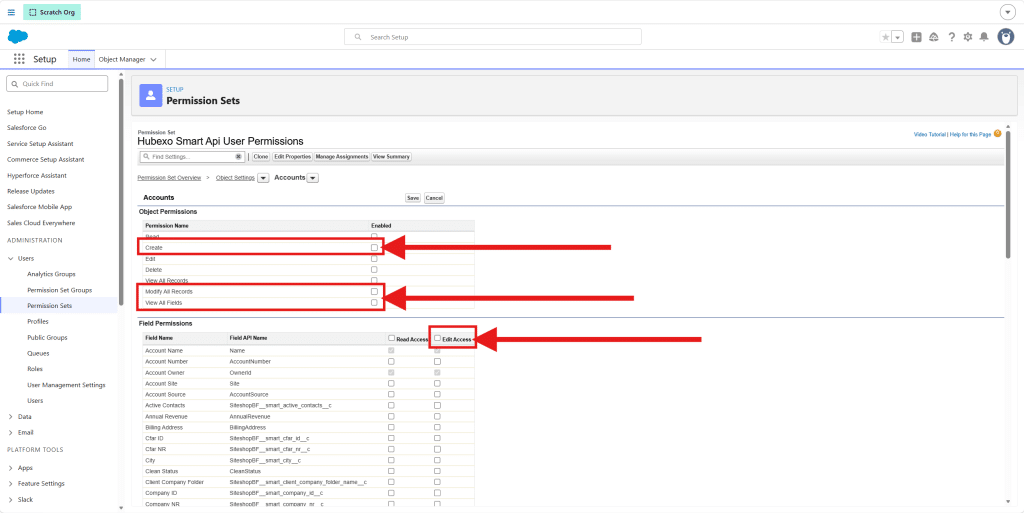
Now we want to click on and enable the check boxes:
- Create
- Modify All Records
- View All Fields
- Edit Access
The order of clicking these does not matter.
Then click on the “Save” button
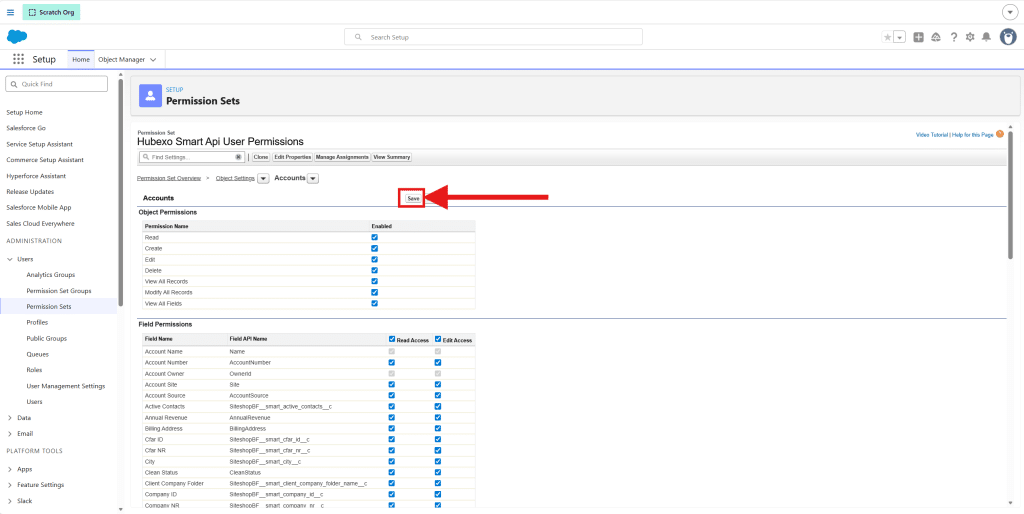
Then click on the “Object Settings”. This will lead you back to the overview of Object Settings
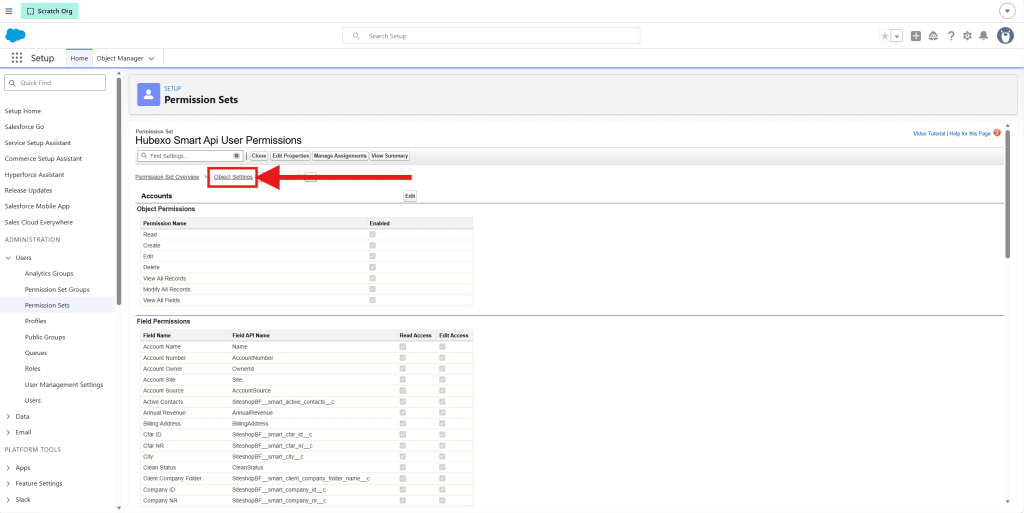
Step 3.1.3: Repeat for the rest of the Object Settings
As earlier mentioned we need to do this for the Object Settings:
- Accounts
- Contacts
- Opportunities
- Smart Projects
- Smart Project Membsers
They are all listed in the Object Settings overview in alphabetical order.
When this is done you can go to the next step.
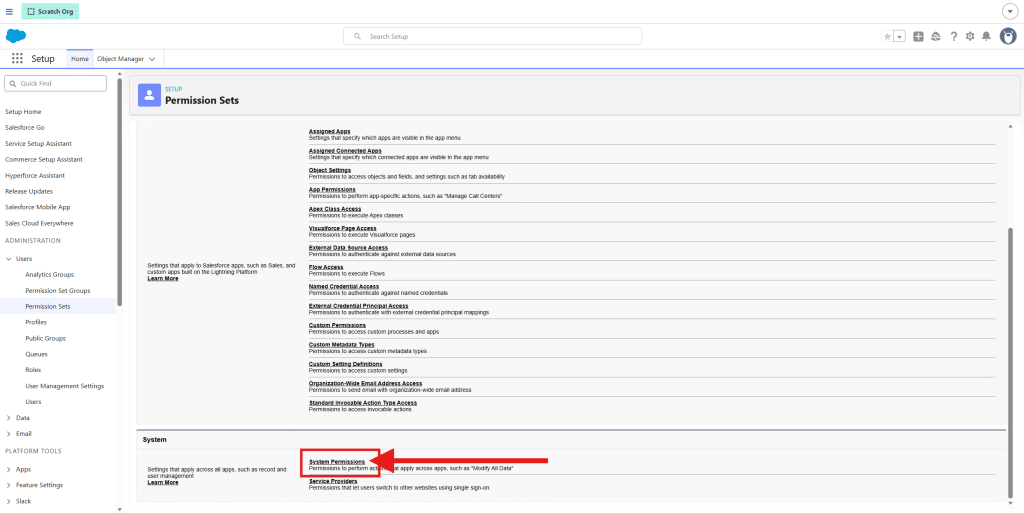
Step 3.2: System Permissions
First we need to go to the “System Permission” page. To do so we need to:
- Make sure the “Users” dropdown in the left side panel is unfolded
- Click on “Permission Sets”
- Click on your newly created Permission Set
Now you should be back at the Permission Sets Overview. This time we need to go to the “System Permissions” which is almost at the bottom of the page.
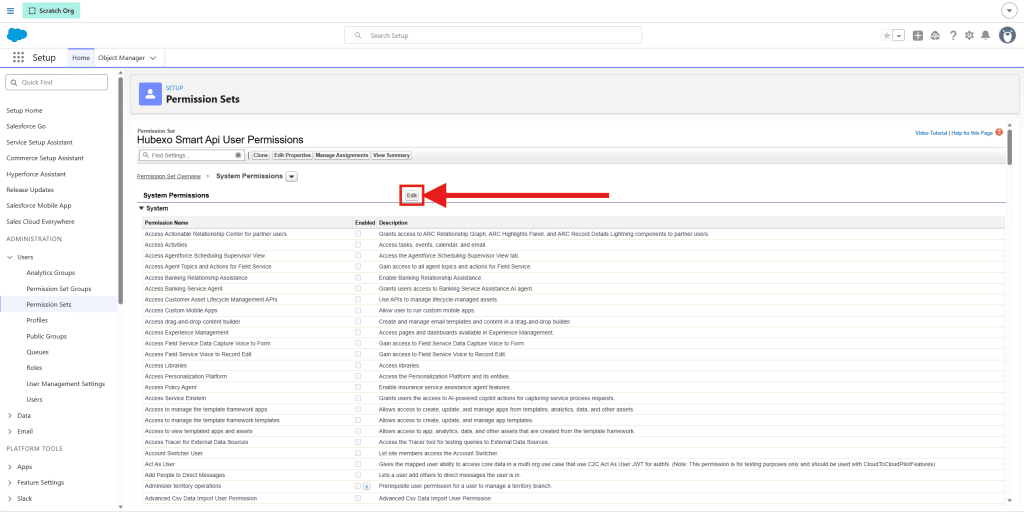
Step 3.2.1: Edit the System Permissions
Click on the “Edit” button
Then scroll down the list and find “View Setup and Configuration” and enable it by clicking its check box.
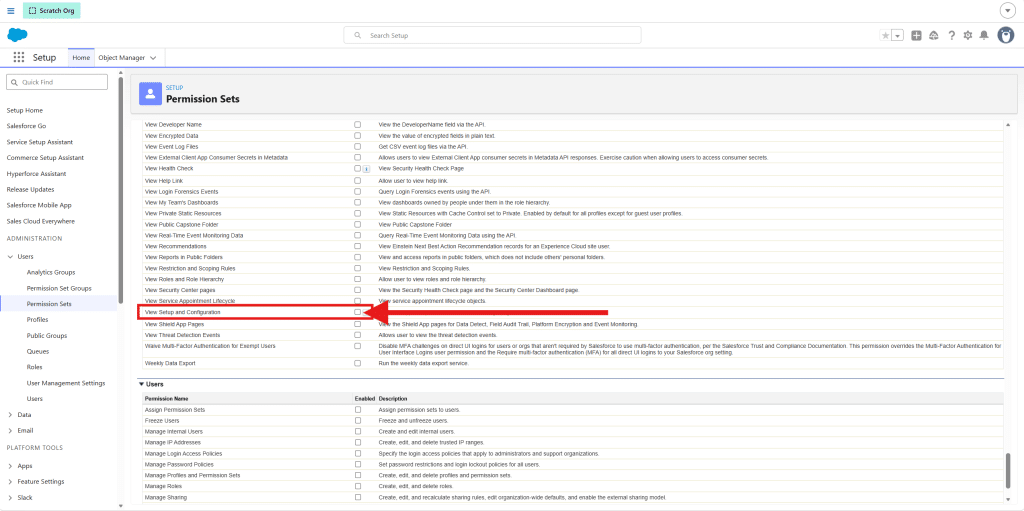
This will enable both “View Setup and Configuration” and “View Roles and Role Hierarchy” which is intentional.
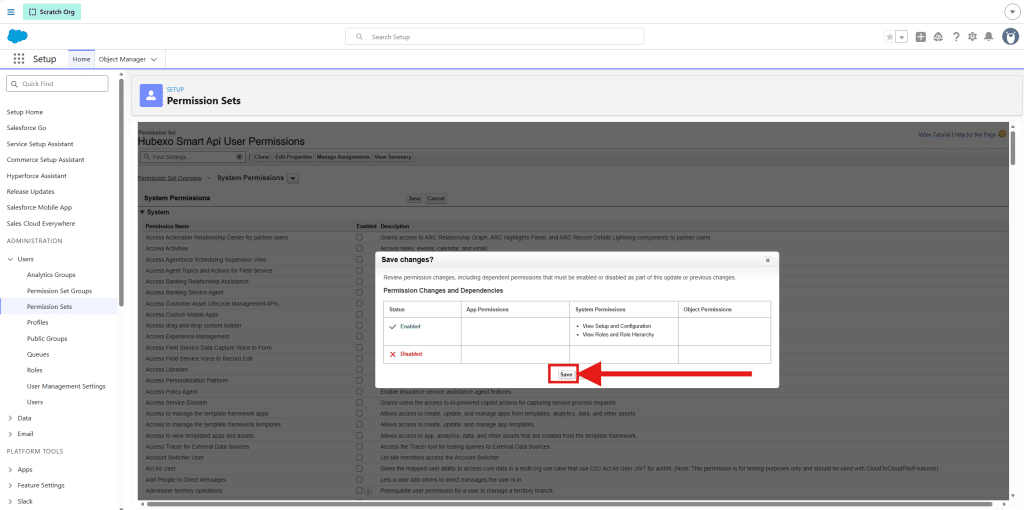
Step 3.2.2: Save the System Permissions
Then scroll back to the top of the page and click on the “Save” button
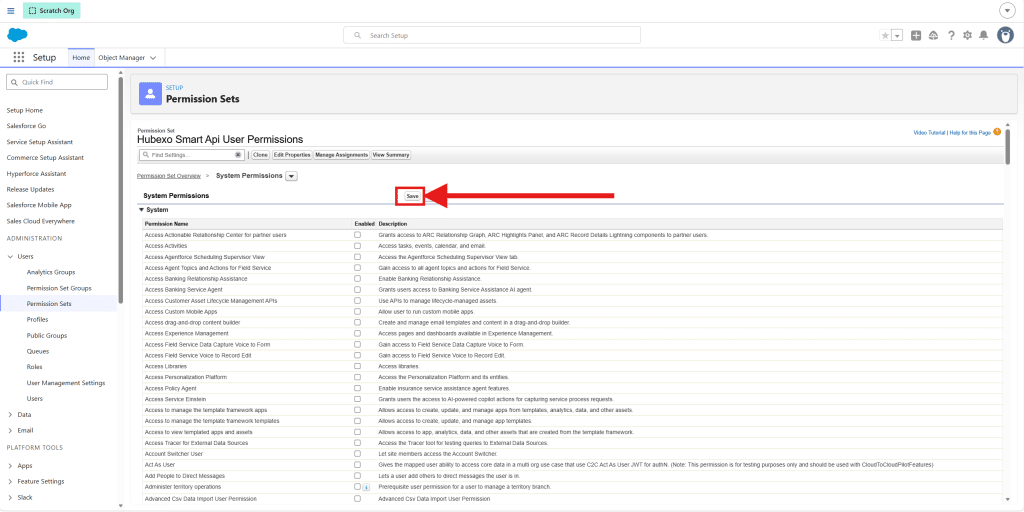
Now you should see a pop-up window asking to review the System Permissions you just changed. Click on the “Save” button in the pop-up window.
Now you are ready for the next step.
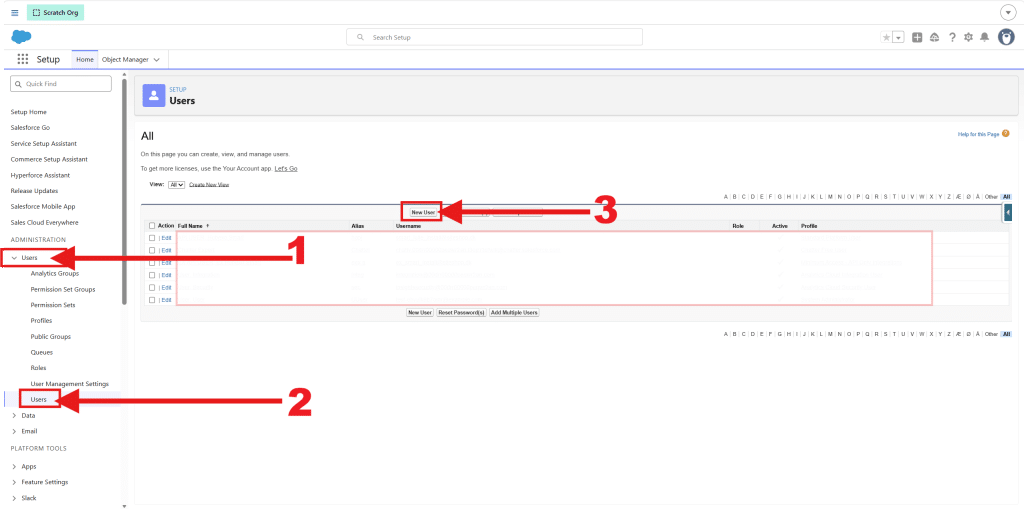
Step 4: Creating a New User
Go to “Users” by typing it it the “Quick Find” box and select the “Users” element in the dropdown or:
- Make sure the “Users” dropdown in the left side panel is unfolded
- Click on “Users” (The item inside the “Users” dropdown)
Then:
- Click on “New User” button
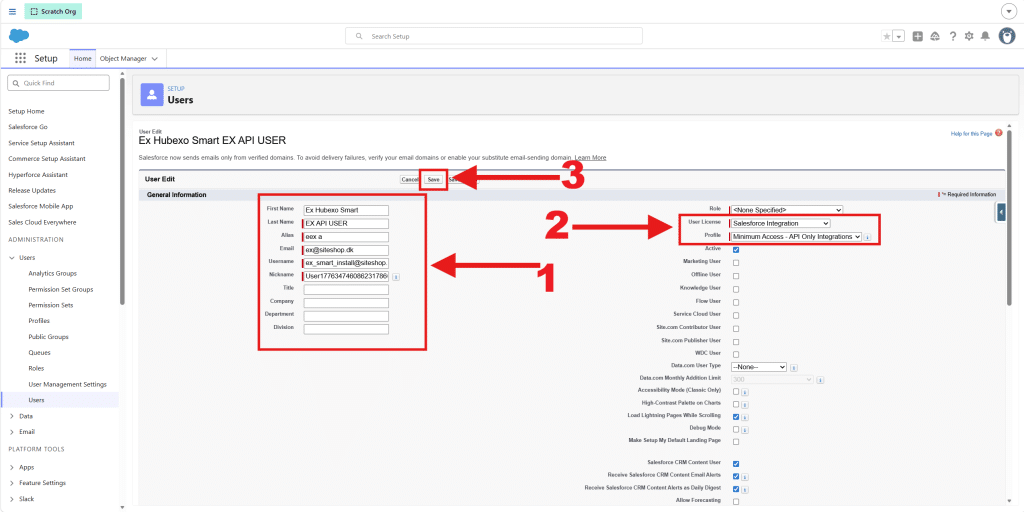
Then in the “General Information” section, you have to
- Fill in the input fields. The “Nickname” is the display name for users in online communities.
- Then you have to set the “User License” in the dropdown to “Salesforce Integration”. If all of the “Salesforce Integration” licenses is in use, you can choose “Salesforce” or “Salesforce Platform” instead.
Then we recommend that “Profile” is set to “Minimum Access – API Only Integrations” - Then click on the “Save” button
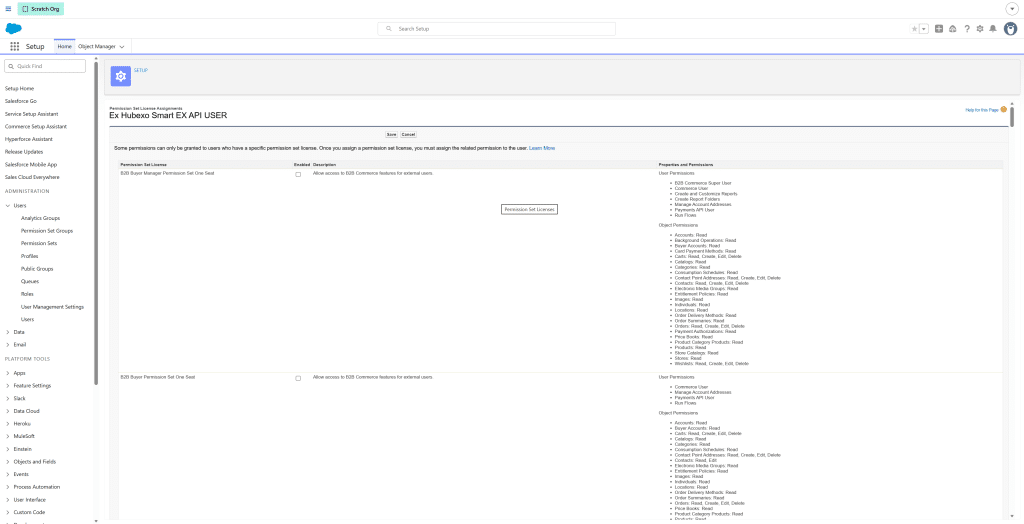
Step 4.1: Edit the “Permission Set License Assignment”
In the User overview you should scroll down and navigate to “Permission Set License Assignment” and click on the “Edit Assignments” button
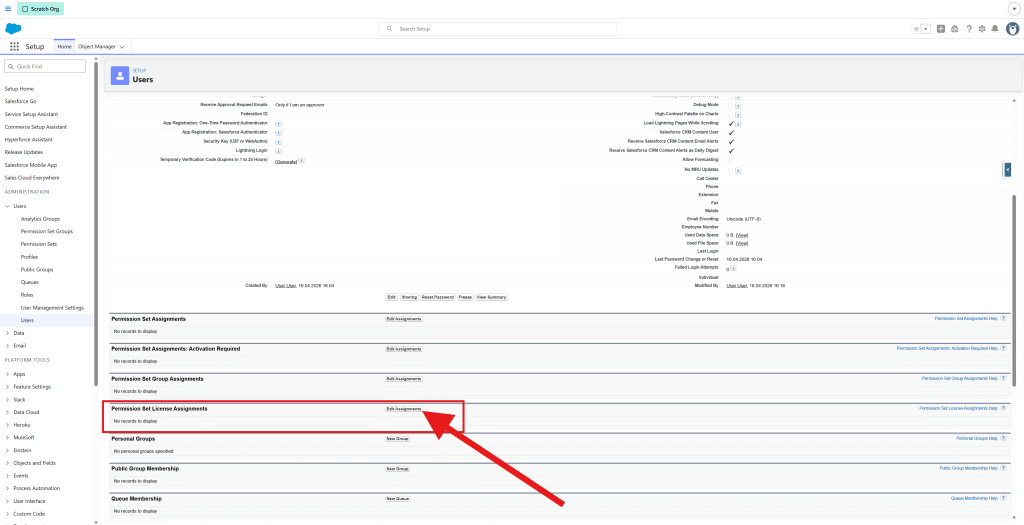
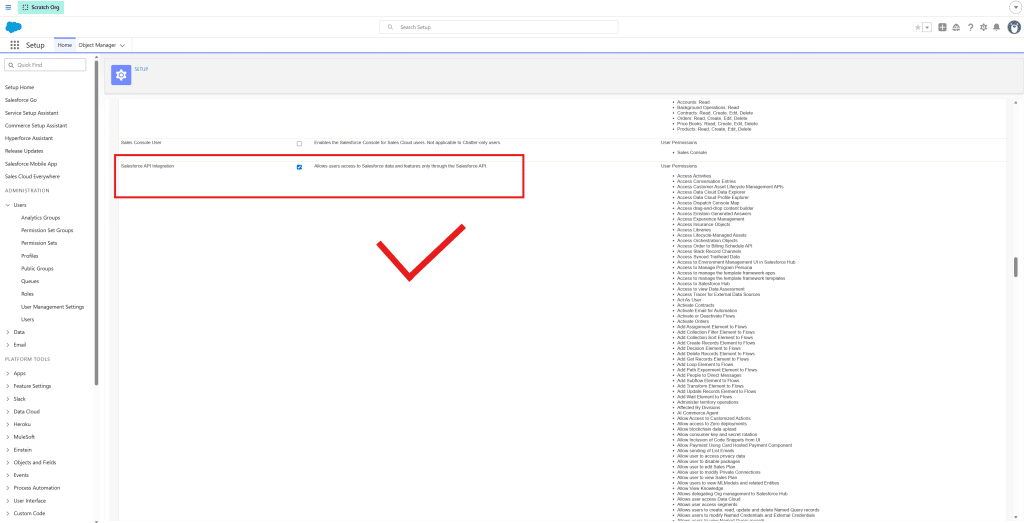
Then scroll down to “Salesforce API Integration” and click on the check box “Allows users access to Salesforce data and features only through the Salesforce API.” and make sure it is enabled.
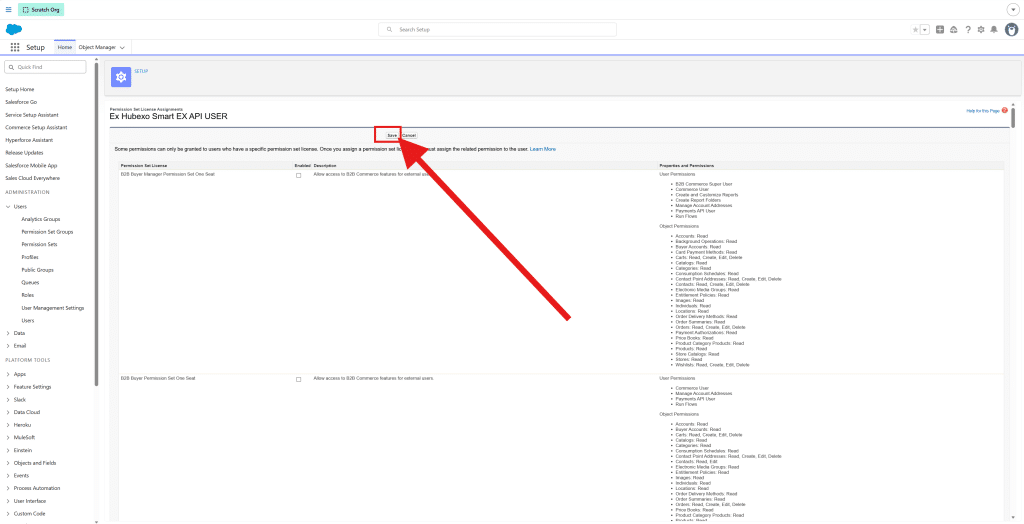
Then scroll back to the top of the page and click on the “Save” button
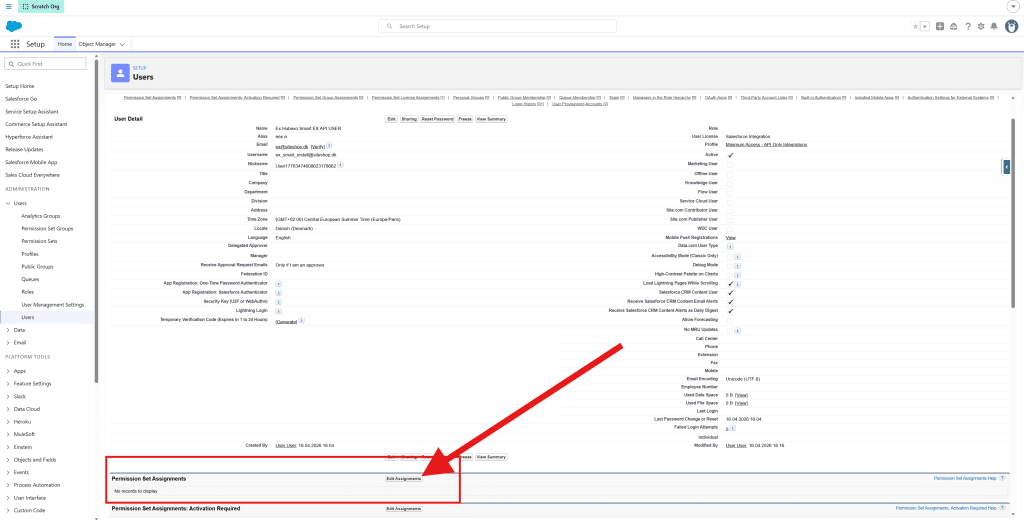
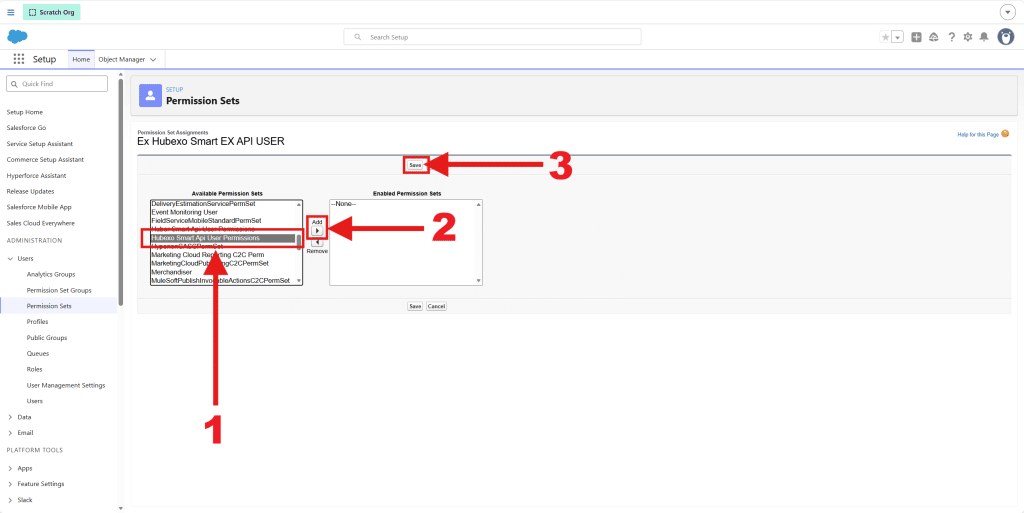
Step 4.2: Edit the “Permission Set Assignments”
In the User overview navigate to “Permission Set Assignments” and click on “Edit Assignments” button
When you have reached the next page, do the following:
- Select the name of Permission Set you made in Step 2
- Click on the “Add” button
- When the Permission Set is added, then click on the “Save” button
Now the user has the needed permissions. You are ready to go to the next step.
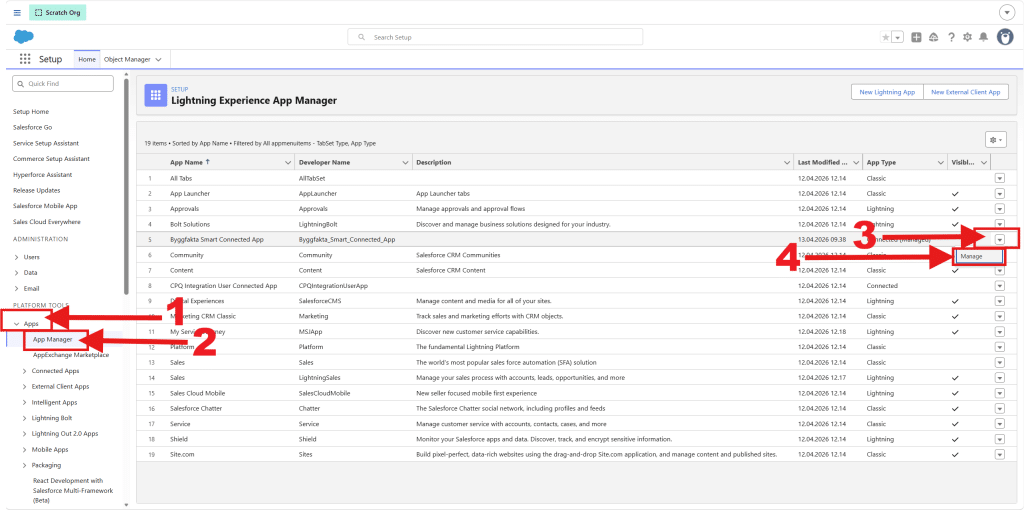
Step 5: App Manager
Go to “App Manager” by typing it in the “Quick Find” box or:
- Make sure the “Apps” dropdown in the left side panel is unfolded
- Click on “App Manager” in the dropdown
After you have entered the “App Manager” page then:
- Click on the small arrow in the right side of the table in the “Byggfakta Smart Connected App” row
- Click on “Manage”
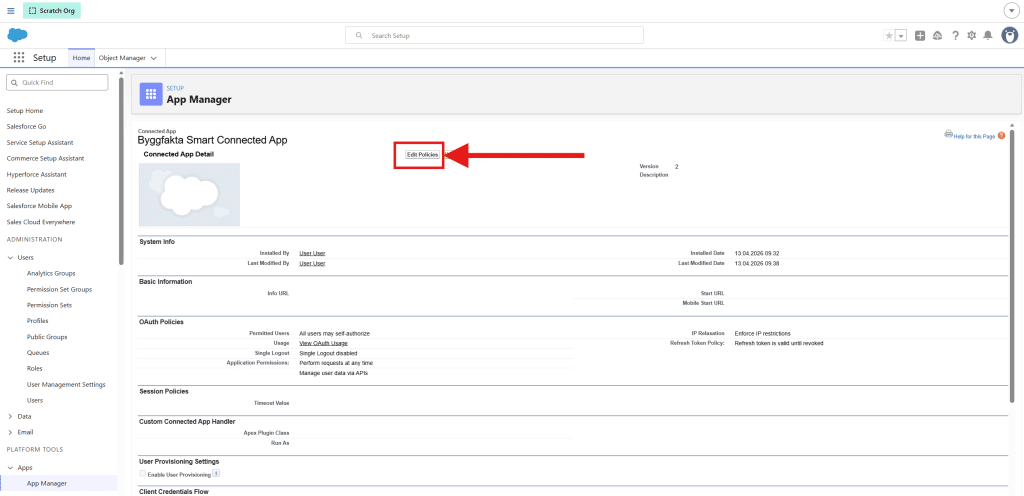
Then click on “Edit Policies”
Then you have to go to “Client Credentials Flow” in the bottom of the page and click on the “Searching” icon
Note: It is really important that you don’t do the following step in the “Custom Connected App Handler” section
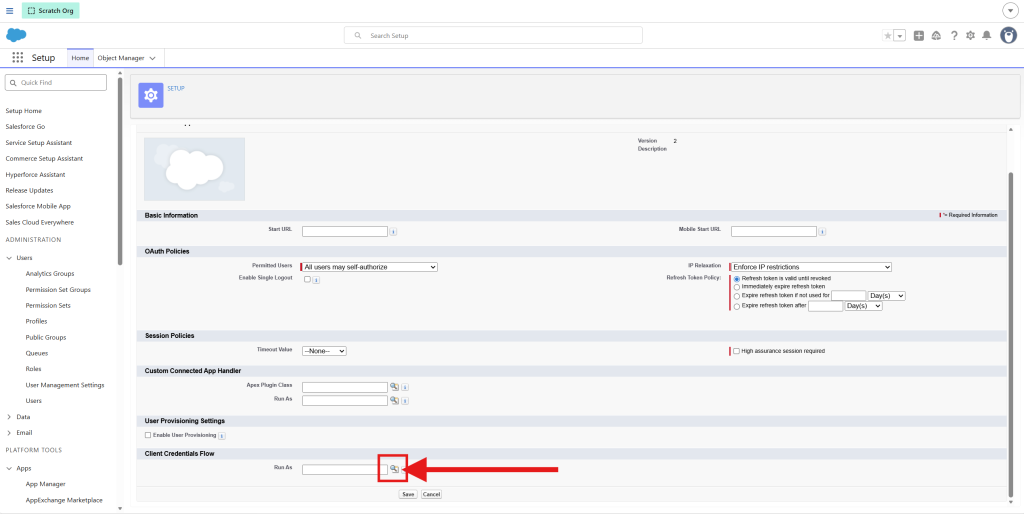
Then a pop-up window appears. Here you will select the user you have created earlier
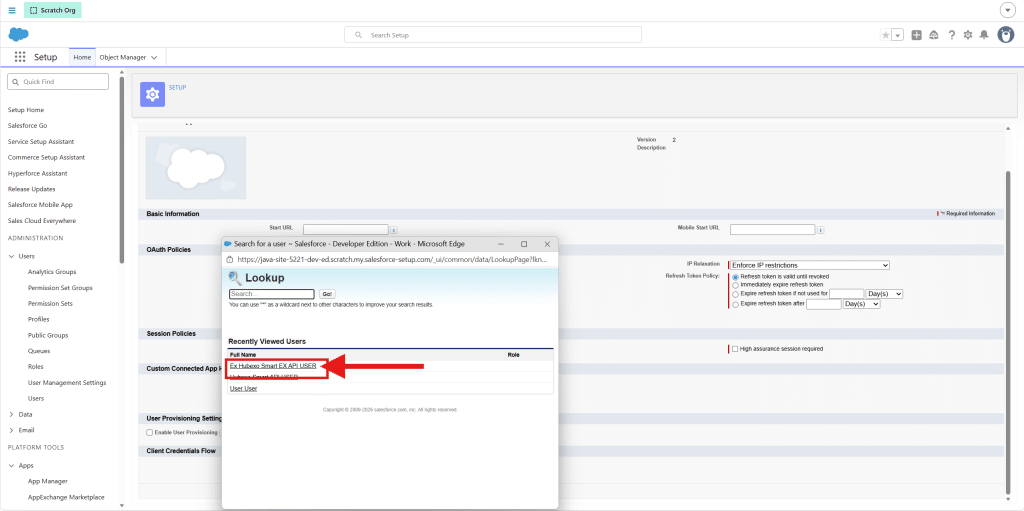
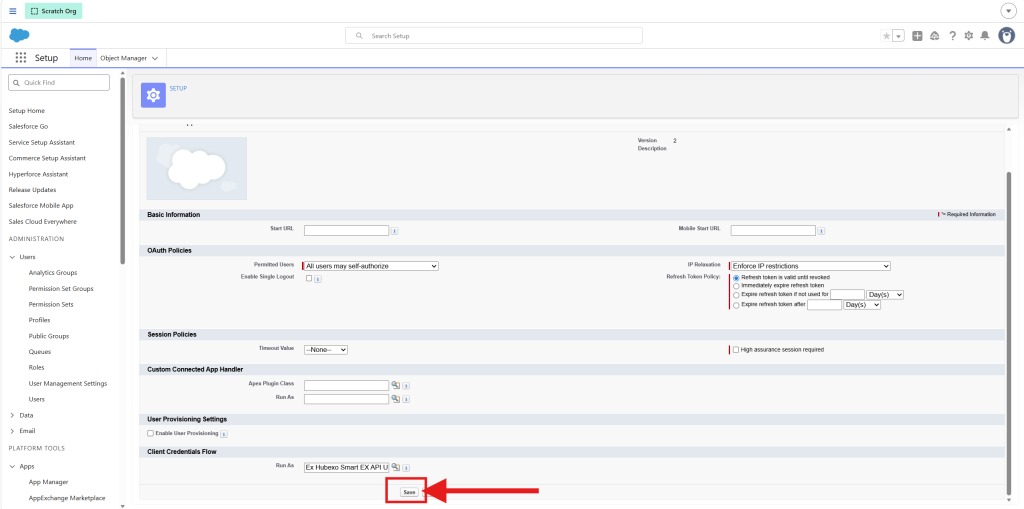
Then the pop-up window disappers, and you can click on the “Save” button
And now you are ready for the next step.
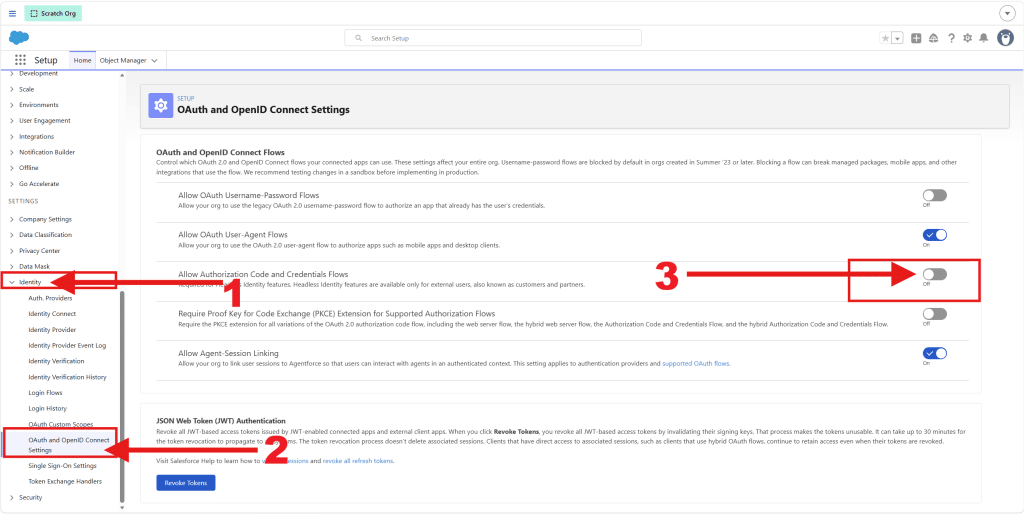
Step 6: OAuth and OpenID Connect Settings
Go to “OAuth and OpenID Connect Settings” by typing it in the “Quick Find” box or:
- Make sure the “Identity” dropdown in the left side panel is unfolded
- Click on “OAuth and OpenID Connect Settings” in the dropdown
When you have entered the “OAuth and OpenID Connect Settings” page then:
- Click on the toggle-button so “Allow Authorization Code and Credentials Flows” is set to “On”
Then in the pop-up window click on “OK” button
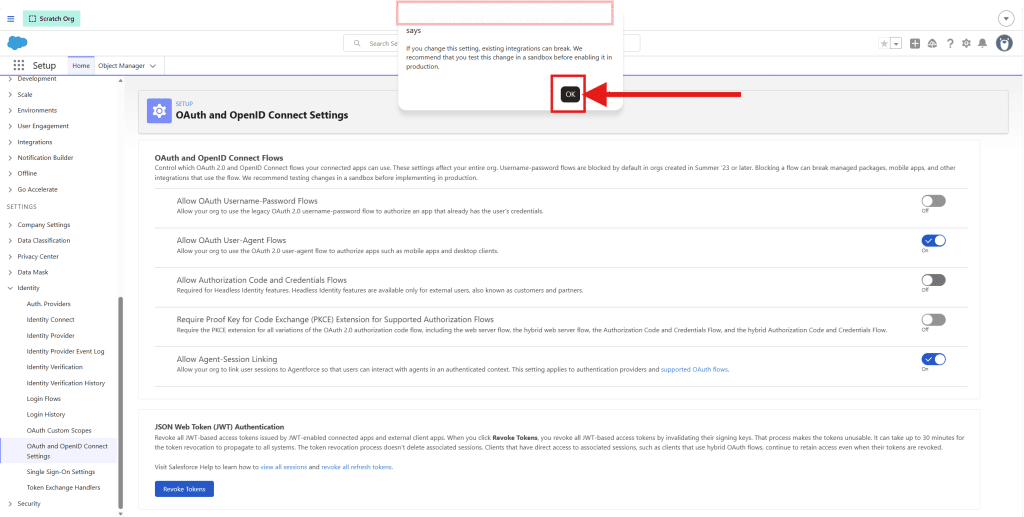
Now you are done with the Salesforce web application setup.
Installation and Configuration
Integration Installation
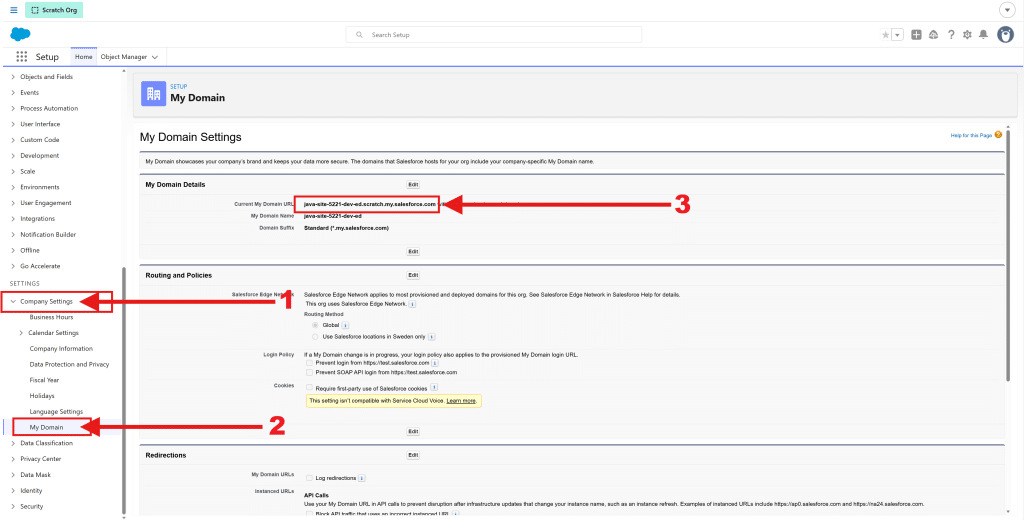
Step 1: Find the required domain
In your Salesforce Setup go to “My Domain” by typing it in the “Quick Find” box or:
- Make sure the “Company Settings” dropdown in the left side panel is unfolded
- Click on “My Domain”
Then:
- In the “My Domain Details” section you have a “Current Domain URL”. That is the one you have to provide at the “Siteshop installation site” in the next step.
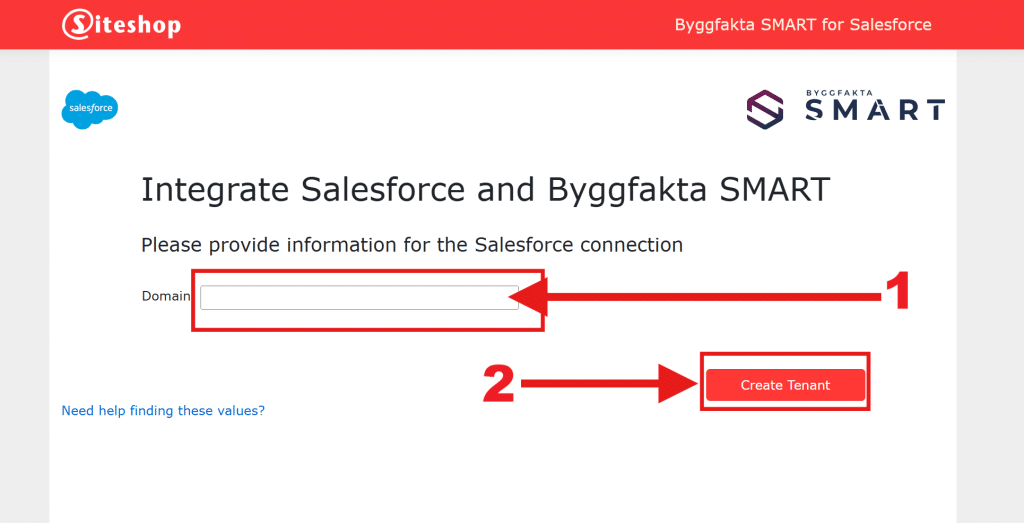
Step 2: Connect app to your Salesforce
- Go to the Siteshop installation site and provide the required domain (From “Step 1: Find the required domain”)
- Click on the “Create Tenant” button. This connects our app to your Salesforce.