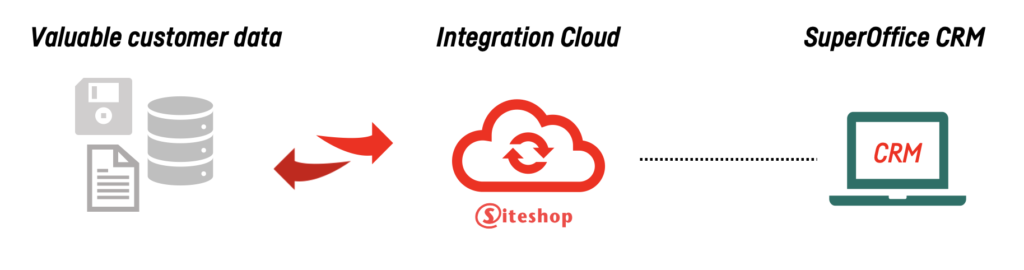
Integration Cloud is a standard integration-app developed by Siteshop ApS that lets you push data to or pull data from SuperOffice CRM, including both the Online and On-premise versions.
Integration Cloud offers you a simple yet powerful way to integrate your business applications with SuperOffice, without having to learn to use a new integration application.
Simply send or upload data in the correct format with the correct field names and Integration Cloud makes sure the right fields are updated in SuperOffice.
It’s like using a very simple API only with CSV, XML or JSON files. The integration itself, the logging, monitoring and security is fully managed by Siteshop as long as you send data in the right format.
This documentation is aimed for CRM integration professionals, administrators and consultans.
In this technical documentation you will find all the needed information so you to set up secure and automatic integrations to and from SuperOffice, using Integration Cloud.
Integration Cloud is very simple to use and includes many powerful features to meet your demands for integration.
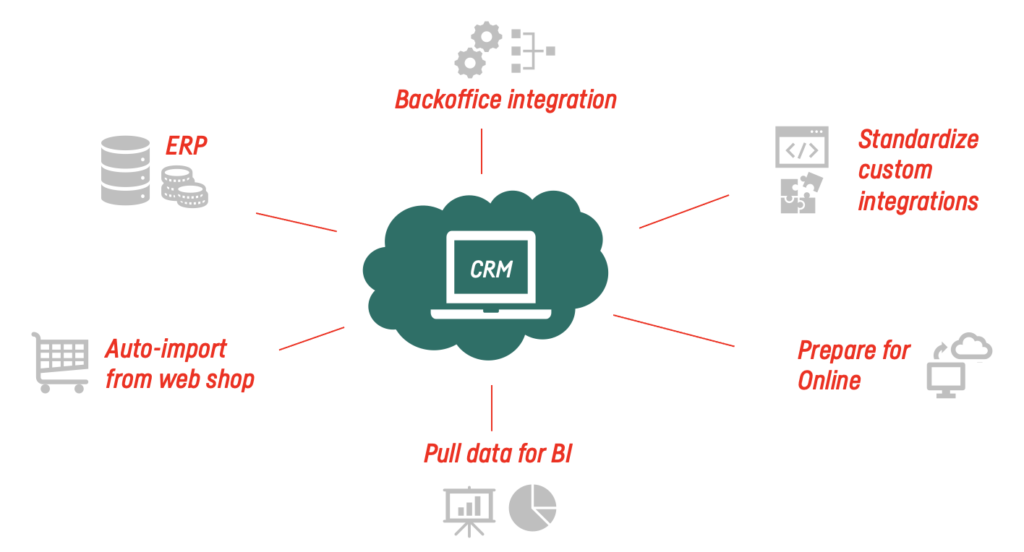
Integration Cloud is designed especially with automatic integrations in mind and as it supports the most popular data formats Integration Cloud can be used for many situations. Here are a few of the typical use cases:
ERP integration
Integration with any SQL based business application
Turning custom legacy integrations in to standard and onlineready
Making data available for other systems like BI, datawarehouses etc.
Auto import data from web-shops like Magento, Woo commerce etc.
Data can be sent to or retrieved from Integration Cloud in different ways. If you want to import data to SuperOffice you can use these:
Imports
CSV file upload to Integration Cloud sFTP
XML file upload to Integration Cloud sFTP
JSON file upload to Integration Cloud sFTP
JSON web service calls to Integration Cloud import web services
Send data from local SQL database with SIC Agent that uploads to Integration Cloud
If you want to export data from SuperOffice Integration Cloud provides this method:
Exports
JSON WS calls to Integration Cloud export web services
Per standard data must be delivered with the correct field names (see all field names in separate documents). However, if this is not possible Integration Cloud can adapt to your specific field names (requires Integration Cloud Pro).
If your data is only available through an external API this is possible too. This will however be a custom job that must be specified, estimated, and executed by Siteshop as a stand-alone project.
Integration Cloud introduces many clever features designed to make automatic integrations as fast, secure, and reliable as possible.
This includes features that can handle large amounts of data, makes sure performance is always high, monitors every import and generally ensure a reliable integration.
Main features
Import / update data from CSV, XML, JSON, SQL sources
Import / update data from JSON web service
Export data through JSON web service
Cloud-based, Zero footprint
Automatic field mapping / no field-mapping interface
Import triggers when data arrives
Export triggers when web service is called
Export caching, to allow even complicated exports to yield fast results
Built-in sFTP account
Built-in web services
Delta Boost ignores unchanged data (CSV imports only)
Data queuing for many files
Supports both SuperOffice Online and On-premise
Data rows with poor quality or format are filtered away to ensure a robust integration
Different entities need different fields so you must produce specific import files / JSON calls for each entity. If you want companies, person and sales to be automatically imported you need at least one company file, one contact file and one sales file.
Please read our specific documents for each data type.
Also read the segment further down in this documentation on “User keys / Unique IDs” to understand how to link e.g. Sales and Documents to the correct Companies and Projects.
The IntegrationID is an identifier that each Integration Cloud customer gets assigned when signing up.
The IntegrationID is part of the security system and helps ensure that data sent from one customer does not end up in another customers database. It is also used to check that each row has a start and an ending and is not broken up.
For this reason the IntegrationID must be the very first field and the IntegrationIDCheck the very last field.
Field-mapping is one of the most important topics in an integration setup. The way Integration Cloud handles this per standard, is to have made the mapping for you already so all you need to do is give the fields in your input data the correct fields names.
In other words, field mapping is done by simply giving your input date the correct field names.
A complete list of all available fields for all available entities is found here.
Standard fields
All standard fields in SuperOffice have logical naming like “Name”, “Phone1”, “Category”, etc.
More-page fields
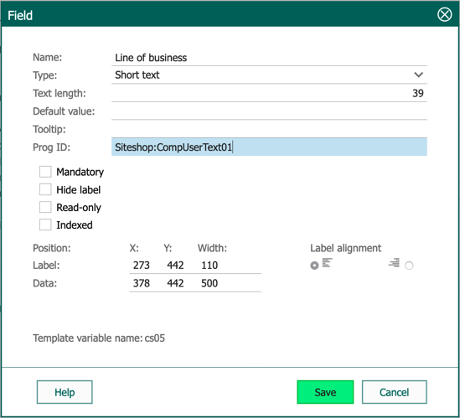
User-defined fields (more-page fields) have a different naming method that maps to the SuperOffice Prog-ID of each user-defined field like “CompUserNum01”, “PersUserText05”, “SaleUserDec02” etc.
So if your input data contains a field called “CompUserText11” it will automatically map to a Company more-page field in SuperOffice with the Prog-id “Siteshop:CompUserText11”.
And if your input data contains a field called “SaleUserDec02” it will automatically map to a Sales more-page field in SuperOffice with the Prog-id “Siteshop:SaleUserDec02”.
The customer-specific identifier. Is assigned when signing up to Integration Cloud
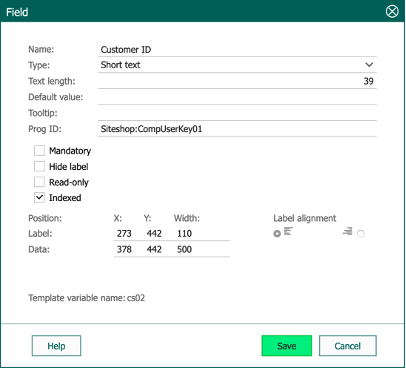
CompUserKey01
Unique ID for each row. Usually customer number or similar
Name
Company name
OrgNo
Org. no. / Vat no.
PostalAddress1
Postal Address 1 field
CompUserText01
A Text more-page field with the Prog-id Siteshop:CompUserText01
CompUserNum01
A Number more-page field with the Prog-id Siteshop:CompUserNum01
IntegrationIDcheck
The customer-specific identifier. Is assigned when signing up to Integration Cloud
As mentioned above data must per standard be delivered with the correct field names. However, if this is not possible Integration Cloud can adapt to your specific field names instead. This requires Integration Cloud Pro license.
Example showing how to enter a Prog ID for a user-defined field in SuperOffice
Each import file must include at least one unique ID per row – these are called User Keys. User Keys helps to avoid duplicate entries and makes it possible to update data. User Keys are also important when you need to import e.g. contacts to specific companies.
The unique ID must always be placed in a more-page field (with a correct named Prog ID) specifically made for this purpose.
The UserKey field is mandatory and if the UserKey field is blank in the input data that specific row will not be imported.
When the input contains a User Key that does not exist in SuperOffice, Integration Cloud will add data as new.
When the input contains a User Key that does exist in SuperOffice, Integration Cloud will update data on the existing entry.
As an example, Company files must include a User Key for each company. Appointment files must include a User Key for each appointment but also one for the company it should be attached to.
These are the SuperOffice Prog id’s used for each entity:
Companies
Siteshop:CompUserKey01
Projects
Siteshop:ProjUserKey01
Persons
Siteshop:PersUserKey01
Sales
Siteshop:SaleUserKey01
Appointments
Siteshop:AppoUserKey01
Documents
Siteshop:DocuUserKey01
Ticket
Siteshop:TickUserKey01
TicketMessage
Siteshop:TMesUserKey01
They should all be created as “Short Text” fields in SuperOffice with “Text Length” of 39 and checked as “Indexed”. We also recommend you to make the field “Read Only”
Example showing how the company User Key “CompUserKey01” must be created.
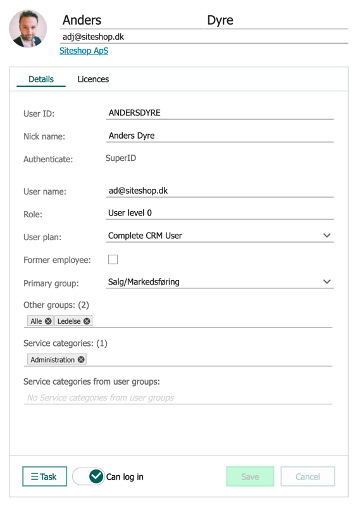
When importing or updating the Our Contact fields you can use either the User ID (AssociateName) or the full name (AssociateFullName).
Our Contact is a list that cannot be added new items to through the integration so the values must be found. If you try to import a value to the list that does not exist Integration Cloud will select the user (Siteshop Information Studio) which is a system user.
In this example data could be either “ANDERSDYRE” (AssociateName) or “Anders Dyre” (AssociateFullName)
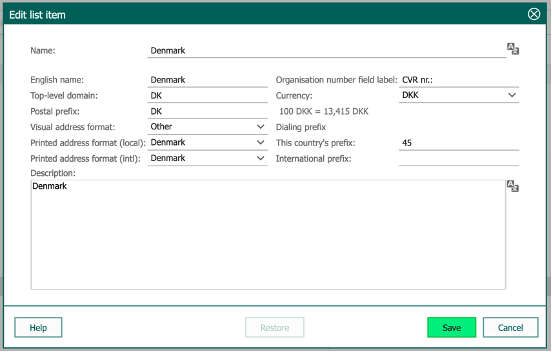
CountryName
When importing / updating the CountryName field you can use either the “Name”, “English name” or “Postal prefix” in the [CountryName] field.
The integration will not add new countries to the list so if your input data has different country names or codes than SuperOffice, you must either adjust input data or adjust the SuperOffice list items.
Cost & Earning
When importing a sale, cost and earning can be set next to amount. There are three different methods of doing so, which will be decided during the setup period with Siteshop.
The fields “EarningPercent” & “Amount” can be included in the data
The fields “Earning” & “Amount” can be included in the data
The fields “Cost” & “Amount” can be included in the data
Including fields “EarningPercent” & “Amount” in the data
It’s possible to include the field “EarningPercent” directly in the data. This way SuperOffice will calculate the earning as X% of the amount. Ensure percentages are represented as decimal numbers without percent sign. For example, 83,5% should be included as 83,5.
Including fields “Earning” & “Amount” in the data
One can include the two fields “Earning” & “Amount”. These two fields will then be used to calculate the “EarningPercent”. Which SuperOffice will use to calculate the earning as X% of the amount. The EarningPercent will be calulated is as follows: EarningPercent=100*(Earning/Amount)
Including fields “Cost” & “Amount” in the data
It’s possible to include the two fields “Cost” and “Amount”. These two fields will be used to calculate the “EarningPercent”. Which SuperOffice will use to calculate the earning as X% of the amount. The EarningPecent will in this case be calculated as follows: EarningPercent=100*(1-Cost/Amount)
If you need to update any check boxes in SuperOffice (standard or MorePage) data must be either “TRUE” or “FALSE”.
TRUE = Checked FALSE = Not Checked
Lists
When setting a value for any drop-down list fields in SuperOffice the input data must be the exact same value, spelled the exact same way, using the same upper and lower case.
If the input data is a value that does not exist in the list in SuperOffice, it will be added automatically for most lists – except for the following standard lists, which Integration Cloud will not add to automatically:
Before you begin importing data to SuperOffice CRM you must make sure that the following preparations have been made.
Make sure that a MorePage field for the unique ID (User Key) has been created for each of data types you wish to import using the right Prog ID (see section on “User Keys / Unique ID’s”)
Country code in the input data must match either the “Name”, “English name” or “Postal prefix” fields in the SuperOffice country list. Adjust either input data or SuperOffice
Make sure that data for AssociateName or AssociateFullName (Our contact) matches either the User ID or Full name for the SuperOffice users
Make sure you have added the necessary “Sale Types” and “Stages” if you are importing sales
Create the MorePage fields you need and make sure to give them the right Prog ID’s and types
Integration Cloud uses IP-security per default to ensure that data for a specific customer only can send from one location. This can only be disabled in certain situations in agreement with Siteshop to do so. IP whitelisting is done with Siteshop during activation of Integration Cloud.
Integration Cloud comes with a built-in sFTP server where you can upload .CSV, .XML or JSON files to. To do this you must receive username, password and IntegrationID from Siteshop.
Every Integration Cloud customer gets a unique IntegrationID that are used as a safety measurement to validate that each data file and each row comes from the right customer.
.CSV files can be zipped and password protected before uploading to Integration Cloud. The password must be shared with Siteshop.
As Integration Cloud uses push and pull principles no access to the customer server is needed from the Siteshop cloud. No credentials are needed and therefore not stored on any Siteshop server.
No imported customer data is stored on the Siteshop cloud server. As soon as data has been processed into SuperOffice the input files are deleted.
When importing through JSON web services a special authenticator code is needed for security. This is obtained from Siteshop when needed.
During the sign up you will be asked to log in to SuperOffice. You must do this as a SuperOffice Administrator.
When you are done you can contact Siteshop (sales@siteshop.dk or (+45) 70 20 19 78) to obtain your IntegrationID, sFTP details and have the registration completed.
We highly recommend that you follow these steps when you are ready to test import:
We highly recommend you follow these steps when you are ready to test import:
Import data with all needed fields filled out – but only a few rows
Check the log (in the Log folder on the sFTP) to see how data is validated
Adjust according to the log if necessary
Log in to SuperOffice and go through every field in the integration and make sure they are correctly imported
Check that all lists are selected correctly
Adjust the input data if needed
Send more data with more rows
Check the log again
Check SuperOffice again
When every test is successfully completed you can then import more or all of the remaining data.
We recommend you use a Field Mapping document as documentation for the integration. This document should describe exactly which fields are sent in the input data and where each field is expected to go in SuperOffice. This also makes for a good list to go through when testing.
We recommend you use a Field Mapping document as documentation for the integration. This document should describe exactly which fields are sent in the input data and where each field is expected to go in SuperOffice. This also makes for a good list to go through when testing.
It is always recommended that you send only new and updated data to Integration Cloud. This is to minimize the load on the service but also to optimize the time for the integration to finish the job.
Full loads of data can of course be sent too but the amount of data will determine how often you will be allowed to send full loads. Please contact Siteshop (sales@siteshop.dk) to coordinate this.
When using the .CSV upload method with Integration Cloud, there is a built-in Delta boost feature enabled automatically.
This feature will determine if the data you send is new, updated or similar to the data you sent last time. Integration Cloud will then only process the rows that are new or updated.
The point of this is to lower the strain on the integration and thus make the integration run quickly using .CSV imports.
Documents can be imported using CSV sFTP and JSON Web Service. The methods differ, but there are some shared commonalities described here.
A Document import consists of two parts:
The File to import, eg. pdf, docx, png
The meta data surrounding the File. This is comparable to a regular Company or Sale import in terms of structure
A Document is, in SuperOffice, displayed closely resembling an Appointment. The meta data is what defines things like the heading, description, company relations, more-page fields, and so on. The File is the underlying contract, documentation, image, spreadsheet, or likewise.
You can find the full list of supported meta data fields here.
Tickets/Requests can be imported using CSV sFTP and JSON Web Service. The methods differ, but there are some shared commonalities described here.
A Ticket in SuperOffice represents a collection of Messages, e.g. emails or notes, grouped together in a timeline. Each Ticket can therefore contain multiple Messages, and each Messages can include one or more Attachments.
A Ticket can import consists of up to three main parts:
The meta data surrounding the Ticket itself. This defines information such as Title, Category, Tags, releated elements (Sale, Project), custom defined fields, and so on.
The Messages belonging to the Ticket, each Messages represents a mail, note, or text added to the timeline.
The Attachments on each Messages, It is possible to include attachments on individual Messages. This could e.g. be documents, images or other files related to the Message.
Note: Although three data types are involved, the import is handled through two separate imports:
one for the Ticket, and
one for the Messages (including their Attachments).
Messages and Attachments are always imported together.
To successfully import a Messages, it must always be linked with an existing Ticket – A Message cannot exist on its own. This also means that the order in whish the data is sent matters, the Ticket must be send before its related Messages and Attachments.
The meta data surrounding both the Ticket and the Message determines what you see in SuperOffice, such as sender and recipient details, subjects, and relations, while the Attachments represent files (e.g. pdf, docx, png, etc.), related to a Message.
You can find a full list of supported fields here.
Adding tags to a Ticket
It is possible to add tags when creating or updating a Ticket. A Ticket can contain no tags, a single tag, or multiple tags.
If the field AddTags is left empty, no tags are added to the Ticket. To add a single tag, specify the tag in the AddTags field, for example: tag1
To add multiple tags, provide a comma-seperated list (,) of the tags. For example, to add tag1 and tag2 to the Ticket, set AddTags to: tag1,tag2
Note: The tags are not case sensitive. If "Tag" exists in SuperOffice and "tag" is added in the AddTags field, then "Tag" will be shown on the Ticket in SuperOffice.
Sending Messages via Email
By default this feature is disabled meaning no mails will be send. Messages can be automatically sent as emails in SuperOffice (if SuperOffice is configured properly). There are several fields responsible for this:
SendTo
SendCc
SendBcc
SendSubject
‘SendTo’, ‘SendCc’ and ‘SendBcc’ are used to specify ‘To’, ‘Cc’ and ‘Bcc’ recipients respectively.
Adding attachments
It is possible to add attachments when creating or updating a Ticket Message. A Message can contain no attachments, a single attachment, or multiple attachments.
If the field Name is left empty, no attachments will be added to the Message. To attach a single file, specify its name in the Namefield, for example: attachment.pdf
To attach multiple files, provide a pipe-separated list (|) of file names. For example, to attach attachment_1.pdf and attachment_2.pdf, set Name to: attachment_1.pdf|attachment_2.pdf
Message Content
There are two fields that can be used to write a Message, Body & HtmlBody.
Body is used to insert plain text, e.g. if it is a comment or a note. HtmlBody is used if we want a html template to be used, e.g. in a mail.
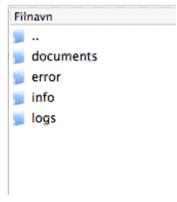
The folder you can send files to looks like this and has 4 subfolders.
When you transfer an input file it will seem to disappear from the folder shortly after. This is for safety reasons and to continue the process of importing it to SuperOffice CRM.
Please read the Document section before continuing
Upload the File or Files to the “documents” subfolder, and then upload the meta data csv file to the root folder. This csv file can contain one or more records, one for each Document File uploaded.
Attachments with CSV
Please read the Ticket section before continuing.
Upload the Attachment(s) to the attachments sybfolder, and then upload the csv files to the root folder. The Ticket csv file can contain one or more Tickets, same applies for the Message files.
IntegrationID – Unique id for the customer’s specific integration
Data – JSON formatted string
Datatype – The type of data sent, you can see the full list in the Datatypes section
Authenticator – A key created by hashing the data, more on this in the Authenticator document.
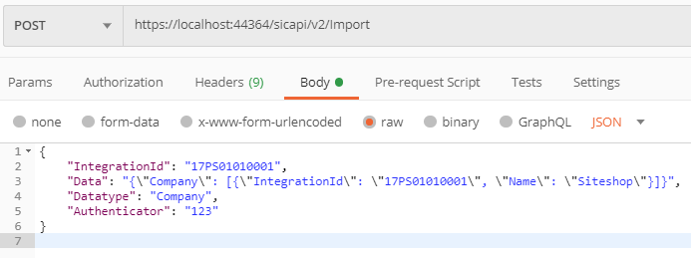
Note that both the body and the Data is of JSON format, and that the Data’s quotes (“) must be escaped.
Example in Postman:
There is also an example of a C# implementation in the section “Examples for C#” -> “POST Import”.
Data
Data must be sent in this structure, where you can have one or more objects inside of the array, and one or more properties inside each object. All objects must contain the same fields. Only one type of data can be sent in a single call.
There are several responses the web service can give. The response is a single JSON object, that contains 2 properties: Code and Message. Where code is an integer for the given error, and message is the human readable description of what went wrong. These codes are returned as string and not as http status codes. The following message are possible:
{“Code”: “200”, “Message”: “Import successful”}
Everything went well
{“Code”: “0”, “Message”: “The application is currently under maintenance”}
Whenever the entire application or a specific customer integration is marked as under maintenance
{“Code”: “1”, “Message”: “IntegrationId {IntegrationId} not found. Contact support”}
If for some reason the customers IntegrationId is not set up, or if the customer mistakenly calls with the wrong IntegrationId
{“Code”: “3”, “Message”: “The data format was not recognized as JSON”}
If, for whatever reason, the program could not calculate the input type. This is mostly the case if the data sent has been cut short, or packets were dropped underway. Checking the sent message and trying again will often help.
First create a class that is the ImportItem that we can population with data before sending it:
class ImportItem
{
    public string IntegrationId { get; set; }
    public string Data { get; set; }
    public string Datatype { get; set; }
    public string Authenticator { get; set; }
}
Then serialize and send it:
using System;
using System.Net.Http;
using System.Text;
using System.Threading.Tasks;
using Newtonsoft.Json;
[...]
public async Task StartImport()
{
Uri uri = new Uri("https://ws.siteshop.eu/SicImportREST/sicapi/v2/Import"); using (HttpClient client = new HttpClient())
{
        ImportItem importItem = new ImportItem()
        {
            IntegrationId = [IntegrataionId],
            Data = [JSON Object],
            Datatype = [Datatype],
            Authenticator = [authenticator]
};
        //Serialize the object and create a StringContent,
        //that we can send to the web service
        string serializedImportItem = JsonConvert.SerializeObject(importItem);
        StringContent content = new StringContent(serializedImportItem, Encoding.UTF8,
"application/json");
        //Send the POST message, and read the result from the WebService
        HttpResponseMessage httpResponse = await client.PostAsync(uri, content);
        string resultContent = await httpResponse.Content.ReadAsStringAsync();
    }
}
Please read the Document section before continuing
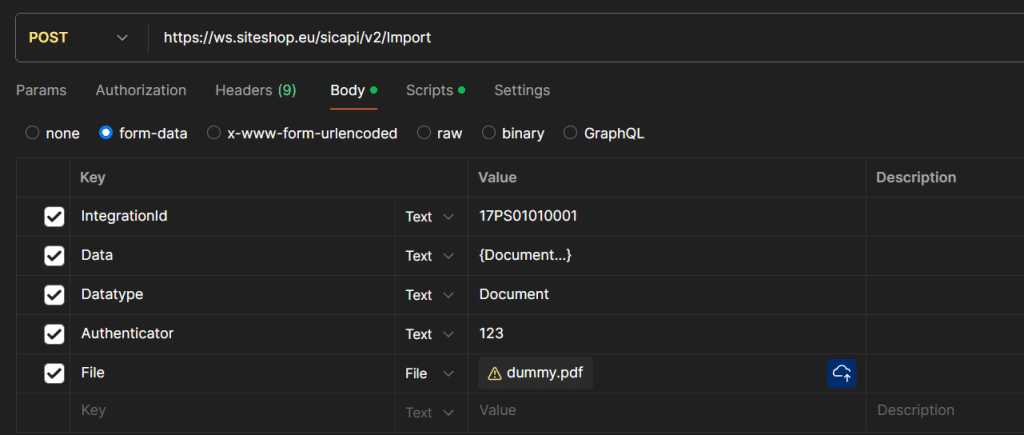
When sending a request to the web service, it is possible to attach a File to the request, so it can be imported to the CRM. This is done by creating a POST form-data request, and adding the File to that request. various examples can be seen below.
Only one File can be uploaded at the time, and as such the meta data should only reference that File.
The field “Name” must be the same as the Filename, ie. “dummy.pdf”.
Importing a TicketMessage works exactly like Document import with Json The primary difference is that it’s possible to send more than one file at the time. It is, however, important to note that filenames must be unique across the entire call, even when sending multiple TicketMessage entities.
Integration Cloud can be used to pull data out of SuperOffice to be used in other applications. You must coordinate with Siteshop which datatypes and fields you need. Contact sales@siteshop.dk to coordinate this.
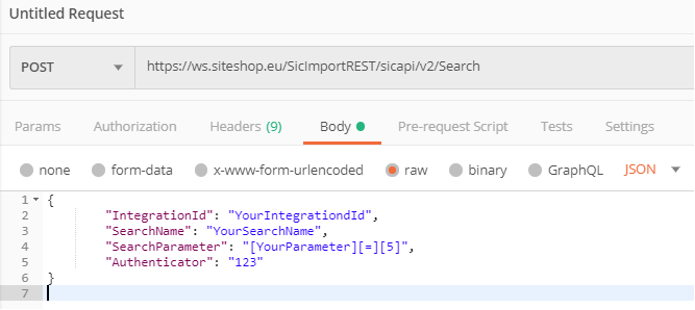
The API is written with REST in mind, and as such follows that as closely as possible. The calls are POST calls, and as such require a payload, defined by Siteshop.
The payload is a JSON formatted text, that includes the following attributes:
IntegrationId
An ID provided by Siteshop
SearchName
Once it’s specified what the customer wants to be able to look up, a Search is created, and named. This is the name of that Search.
SearchParameter
It’s possible to place parameters on the Search, using Siteshop’s syntax.
Authenticator
An authenticator is needed to authorize the caller. This Authenticator depends on multiple pieces of data, such that for example an authenticator for “Search A“ will not be the same as for “Search B”. How to generate the authenticator is shown in the Authenticator document
A call to this URL will perform a Search, and then return that data in a JSON formatted answer. The easiest way to test that a connection can be made, is using an API-testing software; these examples are shown using Postman.
{
"TestData": [
  {
"CompUserKey01": "2345",
"Name": "Siteshop Test Company 2",
"Department": "Lyngby",
"CreatedYear": "2017"
  }
 ]
}
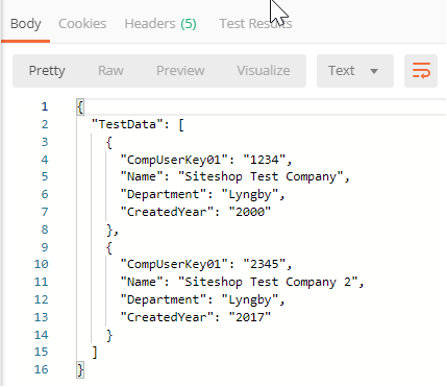
Our result is now smaller and more to the point.
To elaborate; the criteria follows this format: [FieldName][Operator][Value]
Where the FieldName is the name of the field that can be limited on Where Operator can be one of: =, <>, >, >=, <, <= and works like in other languages.
Where Value is the limit that can be set
The operator contains a few more functions than mentioned, however they are beyond the scope of this document. Should you need more precise, or different, functions from the operator, please contact us so we can discuss.
If you have data stored in an SQL-database, you can have the SIC Agent installed on the SQL server and use it to query the data and automatically have it formatted to .CSV and uploaded to Integration Cloud.
SIC Agent is a Windows Service that can be scheduled to run in certain intervals, and it is available in the Pro and Enterprise version of Integration Cloud.
Siteshop will install the SIC Agent by agreement with the customer. A remote connection to the relevant server is needed as well as SQL credentials and information about data.
Available fields
In this section you will find all available standard and more-page fields that you can use for the SuperOffice integration.
Please use the same upper and lower casing as we do in the lists
Always use “IntegrationID” as the first column and “IntegrationIDCheck” as the last in your input files
Remember to use the correct Prog-ID’s when importing to More-page fields